Nikon P330 Black and White
An estimated manual focus point - grab shot at arms length - converted from NRW to JPG.
Nikon P330 - f1.8, ISO 80, NRW to JPG
Nikon P330 Black and White
An estimated manual focus point - grab shot at arms length - converted from NRW to JPG.

Nikon P330 - f1.8, ISO 80, NRW to JPG

Nikon CoolPix P330 - Auto with Self Timer, f2.8, 80 iso
Returning from Las Vegas last weekend, a self/group portrait.
I propped the camera on the dash - balanced on the middle speaker, with the 10 second timer, on Auto.
I can't get over the color rendering coming straight out of the camera where it is on the verge of looking like film, and that's the of the great things about the Nikon P330 CoolPix.
This image is untouched - and you know - maybe this is the way sensors are going. Great color rendering - Fuji has it with their X series. My Nex doesn't.
On the way to Vegas -- gassing up, and who couldn't ignore the big green dinosaur ?

Nikon CoolPix P330 f8.0 iso 80 NRW to JPG
Moving subject matter is better than static - anything to make you work out better familiarization, camera settings, or forcing some problem solving.

Nikon P330 f2.5 200 iso 25mm in 35mm
Lately I've been distracted with the Nikon P330 -- maybe I was smitten with the size - or the smooth square finish. Today I needed the rez and versatility of the Nex-7 and I realize the error in my ways, of ignoring this piece.
When the 7 is on -- it is wow-ing. It will be my heaving lifting travel setup - while I have the P330 in my front pocket.
I now have to ditch the early 80's 50m which I only shoot at 1.4 because I need the light -- else there is some ghosting and negative clarity inherently built it. I need the new 50mm.
Nex, with 50mm Nikon, 30mm Sigma and P330. Debating on including the 35mm Olympus shift.
And three 32gb cards. Done.

Nex-7 with 18-55mm Kit - Lehi Utah
Never a dull moment at the brother in-law's house - this year it's chickens. Too cool.

Nikon P330 - B/W - NRW to JPG with a contrast boost.

Takashi, Nikon P330 f4.0 ISO 400
Shot last night at Takashi Sushi (the best in SLC) - first with a Auto focus tracking - then when I missed the subject I went AF Manual. I was missing the subject with the Auto setting. Every time I learn a bit more - and getting your result is all about anticipating what Vincent Versace would call the "HairBall".
All of this is happening and I'm trying not to look too freakish by taking the same picture over and over -- I framed it up 3 times... and then I quit. Too much compulsion and I didn't want the subject to get uncomfortable. Reference Zoo Animal.
Critical focus is not at its most critical - but it still looks pretty good.
Go with what you got at the end of the day.
The favorite of the day - at Starbucks SLC - using stealthy techniques to get the shot. In retrospect - I should have dialed in the ASA to 80 or 100... at 320 there is a bit of grain - and actually the JPG is super clean. Here is the JPG from NRW.

Nikon CoolPix P330, ISO 320, f4.5
I remember the days when the printed 8 x 10 was the decided factor for judging good rez - and going bigger than that meant you were shooting something special like exclusive 25 ASA or Medium Format. And not too long ago many enthusiasts were arguing about 4mp vs. 12mp. There were those who lamented over the D2h which had 4mp but could shoot very high ISO and those who scoffed at anything less than the D2x 12mp but was crippled past 800 iso.
That was 2006.

Now I'm staring at the first prints from the P330 - and I'm flabbergasted. The print is the proof - where you can stare all you want on screen - zoom in - zoom out, blah.. blahh.. blahh..
And here are the results
4x6 - Excellent - and that's a given. Most everything will look good at 4x6
5x7 - Excellent - I had my doubts going into this - and I wasn't too sure but I had a good feeling the 5x7 would be ok.
12x18 - Excellent - hard to believe - I've looked at them more than once - and then I look again - and I say - I can really print at this size.
All were all 80 iso, except one -- so I thought I was setting myself up for failure thinking anything else would look poorly. But the Barista photo was at 400, and it's slightly off of critical focus, and shows just a touch of noise / grain.
Printed at Costco - with Luster finish - and I'm not bagging on Costco by any means - they do an excellent job for a $2.99 12x18 print. I can do better with the Epson R2880, and so can Miller's or MPix etc -- I just wanted to make it clear I know the difference.
I'm starting to wonder if this is all I take to France in a month.
So let's review:
Wow….
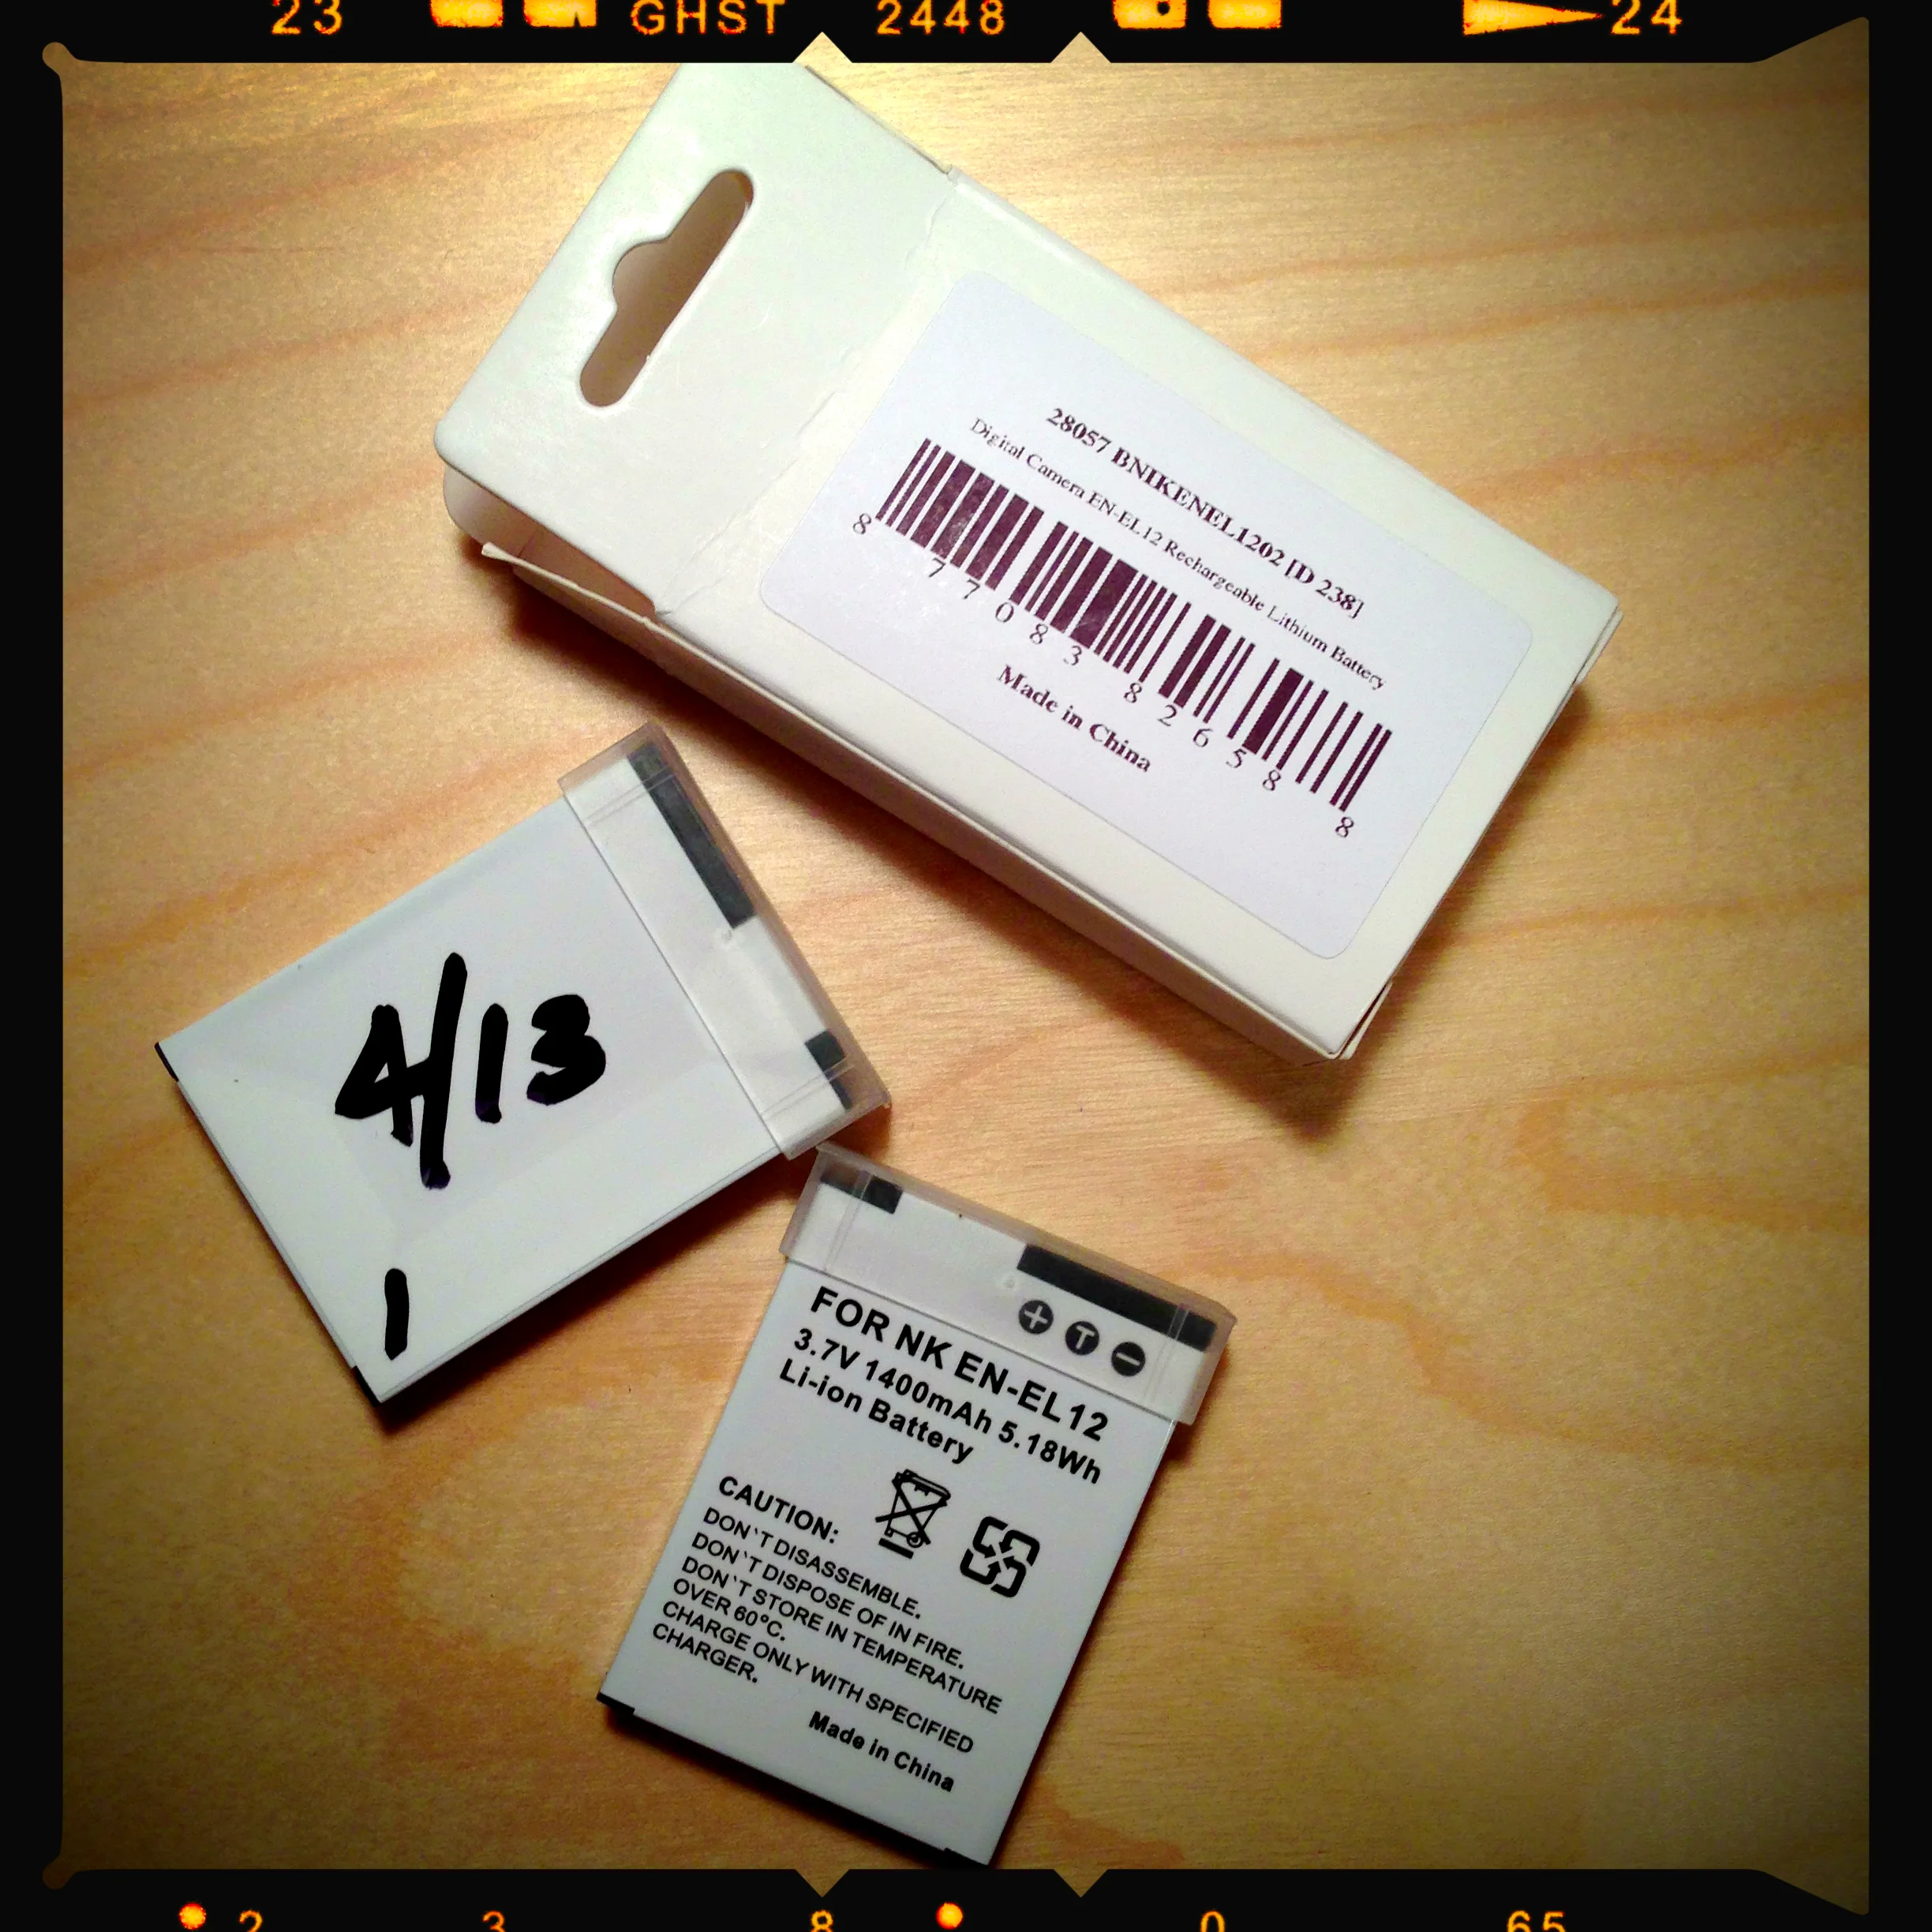
Here's the digital camera / electronics tip of the day.
When you've purchased that new system - point and shoot, D3s, 1Ds etc -- make sure to mark your batteries with a sharpie, with the date of purchase.
Time files - and before you know it - and there is no point of reference to how old those batteries really are, for replacement.
This camera has been on my mind since the announcement a few months ago. I have big cameras, the Nikon D2h, D3s, and medium sized cameras like the Sony Nex-7. But I wanted a smaller and or small camera.
I've had Canons, and the early Canons were some of my favorites - the S410 for instance was an optical performer - and I loved it and then graduated to the SD780. But I noticed that Canon's sensors were not performing as desired - and in the mean time I had to send that new SD780 to Canon for a sensor swap -- the skin tones were much too red and subjects almost became translucent.
I've thought about Nikon -- but never really considered it - until the P330 and what swayed me was the f1.8 lens. And that's really about it - the lens - it's all about the lens.
And as it turns out -- this P330 is a Winner. There I said it -- it's almost crazy good. If it had the build quality of a Canon - it would be even better.
Here are some of my thoughts - with video.
1 - It's lightweight and the frame feels very flexible and cheap.
2 - The interface is un-intuitive. Use the wheel to move backward thru menus / don't hit menu to default back. Caveat - I'm ingrained to the Canon Powershot interface - shame on me. There is an FN button on the front which is slightly programmable.
3 - Shooting indoors with low light - is slow - and not very "Snappy" - shooting everything at auto ISO although f1.8 is nice to have - most of what I shot was a iso 200-400. Maybe it wasn't a fast aquire of focus because I was using very challenging indoor light.
4 - Shooting indoors at 1030am skylight lit subjects -- focus is snappy and fast and almost impressive shooting at f2.8. Increasing to f4.0 and focus lock slows just a bit (enough to notice)
5 - Battery charging is confusing - their USB cable is proprietary - epic fail. A plug adapter is included for the USB cable. An individual charging adapter similar to Canon would have been a better solution.
6 - Bottom Left corner of the display doesn't display ISO dynamically - I can't see what it was until I hit the play button to review the shot.
7 - Movie settings are confusing - 1080p30*, 1080p30, 1080/60i, 720/30p, iFrame 540/30p, 480/30p, HS 480/4x -- so.. .where is 24p ?
8 - Instruction Manual is disappointing - there are more pages spent on setting date and time and no pages describing movie settings - epic Fail. There is no electronic version on the NikonUSA web site - Epic Fail.
9 - Images appear crisp and sharp - at 100% on screen they are excellent - at the higher ISO's they do show some crunch - considering this sensor size I think this is excellent. Images are very, very impressive I'm really loving them. Sharp - sharp - sharp !! There is even some Bokeh - when shot wide open.
10 - From viewing in a quick download of Nikon's NX - the RAW appears to look the same as the JPG at 100% - I will have to spend some time with that. Raws are 25mb and jpgs are approaching 5mb.
11 - Write time speed to the card isn't impressive and actually pretty sluggish for both jpg and raw.
(Click Thru Images for the Hi-Rez Gallery)
Nikon CoolPix P330, f1.8, ISO 80, 24mm in 35mm
**** Update Mar 30 ****
There was a request to publish images of higher ISO - so here are some at 800 and 1600. Focus point is the cat in the left center.
This exercise was interesting - as very quickly these images at this high iso became very "crushed" in the details and exhibited a "Plastic" look. This 1600 looks very similar to what my D3s would be at 6400. Interesting. And -- 800 and 1600 look the same.
Also -- I've had two malfunctions in the last 48 hours. The first was when powering off and the lens would not retract -- the second was trying to figure out how to get past 800 iso in the menu. I couldn't scroll past 800 -- it looped back to Auto. I powered off -- removed the battery, powered back on - inserted the battery - and then powered up. Same condition. I had to reset all settings to default, from factory in order to get past iso 800 in order to get to the selections of 1600, 3200, hi1 and hi2.
(Click Thru Images for the Hi-Rez Gallery)

Nikon CoolPix P330, f5.6, ISO 1600, 24mm in 35mm
**** Update Mar 31 ****
I'm glad those on the DPreview brought up the fact that these first images are a bit crunchy because of the in camera settings of - Sharpness, and Picture control and Noise Reduction.
This set is with the following settings.
Sharpness = 0, Picture Control = Neutral, Noise Reduction = Low.
I have two sets of photos - the in camera JPG's and the Nikon NRW's or (Raws) - and I'm a bit disappointed in myself where I didn't do this Raw and JPG comparison in the first place. I have the DPreivew Nikon CoolPix forum to thank for keeping me on track.
This is all said - because these results are - crazy dramatic and I'm glad I didn't miss these results by not shooting NRW. And in my opinion the performance of this very small sensor at these ISO's is really good.
The NRW's were pulled into Nikon's ViewNX (free on Nikon's site) and developed with the following settings.
Sharpness = 5, and ColorBoost = 16 and then converted to JPG.
JPGS were left untouched.

Nikon CoolPix P330, f1.8, ISO 800, Shot as JPG in Camera

Nikon CoolPix P330, f1.8, ISO 800, Shot as NRW, developed in ViewNX

Nikon CoolPix P330, f1.8, ISO 1600, Shot as JPG in Camera

Nikon CoolPix P330, f1.8, ISO 1600, Shot as NRW, developed in ViewNX

Nikon CoolPix P330, f1.8, ISO 3200, Shot as JPG in Camera

Nikon CoolPix P330, f1.8, ISO 3200, Shot as NRW, developed in ViewNX
Nikon P330 CoolPix f3.2 ISO 80 50mm in 35mm, NRW raw to JPG

Nikon P330 CoolPix f1.8 ISO 80 24mm in 35mm, NRW to JPG
Audio -- another learning curve
Good Audio is a beast - and either it's there - or it isn't - so I've decided to get a handle on it. But - I don't have any decent Mics -- other than my RODE Video Mic. I always thought it was a bit huge - so I started some research for either dedicated for the Olympus LS-7 or iPhone.

I had the thought of a dedicated iPhone mic - and it seems RODE is the only one producing such -- http://www.rodemic.com/mics/smartlav
The RODE SmartLav -- from what I've seen, it seems to be "ok", yet I'm not convinced - hit the youtube's - some are good and some are bad.
So - instead of a dedicated device I decided to get a decent regular LAV -- from Giant Squid Audio http://www.giant-squid-audio-lab.com/gs/gs-mono.html
He's a cottage business, but is off the charts for good bulletproof gear -- did I just say bulletproof -- oh, yeah... that's right -- his stereo lavs survived my tour in Baghdad. But I digress... "they never got shot, for what it's worth"
This convinced me -
Then -- I decided to pull one of these - iphone mic adapter - no power needed... boom ! http://www.kvconnection.com/product-p/km-iphone-mic-ecm.htm
Why -- 'cuz I want to start pulling some good audio, either with iPhone or externally with my Oly LS-7 -- and then layering on video.
Now onward to homebrewaudio and to figure out Reaper.
It has been a while since I've posted anything with the Olympus Zuiko 35mm f2.8 Shift.
I never really plan to use a particular lens, and there are times when what I thought I was going to use, ended up not being the case. Today was no different - and as luck would have it, I thru myself a curve and adapted the lens to the NEX versus the D3s.
I really wanted to capture the spired East facade of this building - but the impending storm clouds kept the Sun away - so I used the diffused light to showcase the dramatic interior lighting of the North entrance.
As I set up the scene - I knew I was going to shift it - and then I decided to use the NEX - and of course because of the cropped sensor, the 35mm became a FOV of 50mm. With a few steps back - I was able to fill the frame, confirm critical focus - and boom. Thats the short form - it really took about 20 minutes for it all to come together.
Lessons learned; if you think you will need a tripod - you will need a tripod.
As I've said before - this is a good lens - critical focus is unforgiving, and micro contrast is about 1/2 of that of a state of the art lens. Post processing eats up clarity and contrast and of course sharpening. Bring all that in balance and the results are very good. I've used this at 35mm many times on the D3s and this is really the first use Architecturally at 50mm FOV on the NEX.
I cropped square - and I'm pushing the envelope here - as I don't crop. But -- for this view the crop reflects the subject very, very well. And so I went for it.

Salt Lake City County Building - Sony Nex-7, adapted Olympus Zuiko 35mm f2.8 Shift
I've seen the this format for a while -- and I didn't give it much thought, as I'm a bit of a purist. Ok -- I"m a purist.
But I decided to push the envelope - and crop: "go figure" and then -- get this -- crop 16:9.
Wow -- ok - there's a lot to digest there.
As MJ would say -- I'll let that "simmer".

Attending his week long workshop at his home and studio is a life goal.
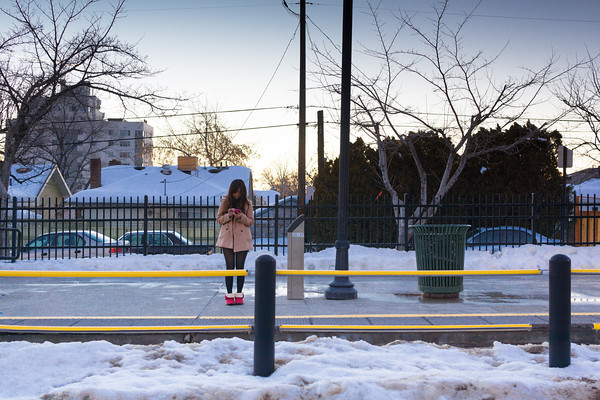
These are some of my favorites of the walk from the office to the Trax Friday evening.
It's very satisfying to anticipate a shot - adjust camera settings on the fly - and then compose and shoot.
The first "real" images with the Sigma 30mm f2.8 - fov at 45mm - and I love the sharpness. This lens is a keeper for sure.
Some of this set will be in this years Top Ten.


So -- in order to get the most visual impact of plant "growth" -- keep this in mind -- use a short interval - I eventually used a 2 min interval -- for 24 hours and compiled at 30 fps.
I wish I could have increased the hourage, but that's the limit on this app in the conventional setting. The default setting may have some more flexibility - but my brain was in knots trying to figure it out.
I would like to spend some more time on this -- but it's a bit of a dance to align everything - get the lighting - of which I would need more of - and of course time. So - in that regard - I've decided to just enjoy the orchids for now. But it's still a cool process. Meaning - I can't compete with the pros and get what I really want - so I'll quit while I'm ahead.
My wife's iPhone is in need of a microphone replacement - and until I can fix it, (we've since bought a new one) I've decided to use it as a time lapse camera.

I grow orchids, and this season they are growing like crazy -- I have 4 with new spikes - all within about 2 weeks of each other. I've never seen that happen, and I have no reason why.
So -- as I check on these - I would swear they grow about 1 cm a day -- and so I decided to set up the iPhone as a time lapse camera.
I installed "Time Lapse" -- about 4 bucks - with a tripod - and an overhead light - setting the App to take a frame every 15 seconds -- for 12 hours - the app then will combine all frames to a movie ready to upload to youtube.
Lessons learned -- Interval is too quick -- should be about 1 minute - to get the full effect of growth. The HD upload option to youtube will be used also.
And -- I need to set this up for at least 24 hours -- and ideally "days".

But -- wow -- what crazy technology to have in the palm of your hand.
I'm running it again today -- for 24hr and a 1 minute interval. I'll post when that is complete.
I didn't expect to make any keepers - but it all came together. A quick tour of the new Utah Natural History Museum - commissioned by Ennead Architects - http://ennead.com, in NYC, provided the canvas.
M and I were a bit cooped up yesterday and we wanted some distraction - and although I was surprised at the $11.00 admission -- per person - we were all in. I remember the Chicago days where Natural History and Science and Industry were; well -- just walk thru the door events. How times have changed.
The spaces are definitely worth a look. If you can afford it.